Build Your Command Center
The first step in building a tool (if you ask me) is to create a command centre, or a way for your user to interact with your tools – you may have experience with many command line applications where you pile a bunch of different directives and options onto an application hit enter and bam you have your answers!
For those who may not have used command line applications before I’ve included an example using the free and open-source tool nmap which can be used for security scanning, port scanning, and network exploration.
In our example above we are telling nmap to scan all ports -p- on the host 192.168.0.1. This is a relatively straight-forward example, and in some cases command line arguments can get complicated quickly. But we aren’t worrying about that just yet.
Concepts Covered
Ingredients
One python file called
main.pyoryourprojectname.pyOne dash of
argparse, a Python “built-in” meaning you don’t need to install anythingOne cup of sweet ASCII font (optional)
Method
Creating a New File in PyCharm Community Edition
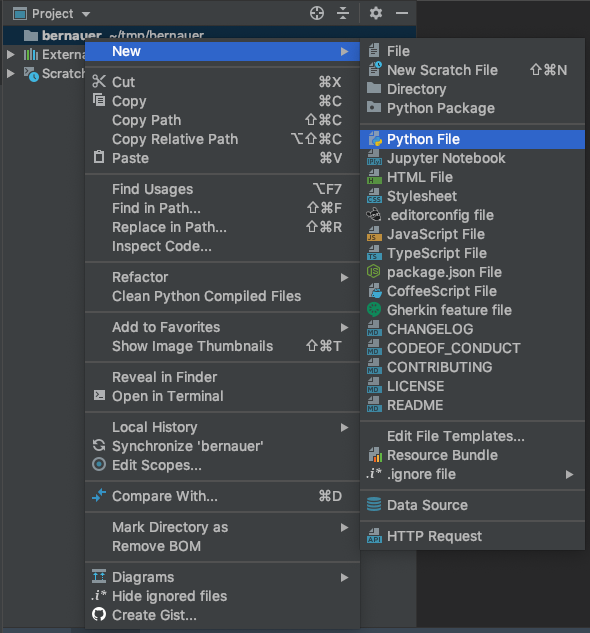
Create a new Python file, this can be done by right clicking on your project directory (for me that is bernauer) and highlighting New and selecting Python File:
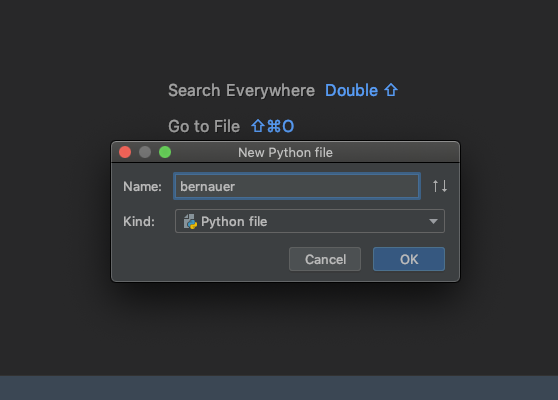
New we’re going to create the file that users (or just you) will be using to run the application – I suggest naming this file either the same thing as your project, or main:
Creating a Function to Parse Arguments
Next, we’re gonna create a small command line interface (CLI) that users can use to specify how the application should run. For now, it should only have a few things (we will add more as we go). You’ll want to include:
An option to provide a domain name
An option to provide a word list
To get started we will want to create a function to build and handle our argument parser, a very simple example which does nothing is shown below:
import argparse

def build_argument_parser():
    return
The Anatomy of a Function
A function is a block of code which only runs when it is called. Functions in Python begin with the def keyword and then a name that you provide, while Python is pretty flexible about naming, there are a few things that your IDE might flag as not quite right as they go against convention, specifically PEP-8.
What is a PEP?
PEP or Python Enhancement Proposals which is a design document providing information to the Python community or describing a new feature for Python or its processes or environment.
Naming a Function
Back onto PEP-8 though. So PEP-8 is a style Guide for Python code, and is probably one of the most well know, and well cited PEPs. It’s what defines what is and isn’t considered “pythonic” but the most important thing to remember is, it’s only a set of guidelines to help you make your code more readable, it’s not mandatory and sometimes you may find that going against the PEP makes things a little easier.
PEP-8 tells us that when naming a function, we should use lowercase with words separated by underscores as necessary to improve readability.
However other casing types such as CamelCase and snakeCase are also very common to see.
def check_host_is_online():
    pass
def CheckHostIsOnline():
    pass
def checkHostIsOnline():
    pass
Passing in Arguments
We can also pass information into functions as arguments. Arguments are specified after the function name, inside the parentheses (()). You can add as many arguments as you want, just separate them with a comma.
You can also make mandatory and optional arguments, as we discuss later in Parsing User Input section, this makes it possible to handle various conditions, but it can also decrease the stability of your code at runtime if exceptions are not handled properly.
In the following examples we show you how to pass in arguments, and make some of them optional:
Positional Arguments
The following example has a function with two arguments (title and first_name). When the function is called, we pass along a title and first name (in this order), which is used inside the function to print the full name:
def print_welcome_message(title, first_name):
    print(f"Welcome {title} {first_name}!")

print_welcome_message("Mx", "Buffy")
Welcome Mx Buffy!
Optional Arguments
Using the same example we can change our print_welcome_message() to also work if people don’t want to provide their title or name, by making both these arguments optional, however, as we mentioned earlier we need to make sure we do some checking so our code doesn’t break.
We make our argument optional, by including a default value in our example, we are saying that by default title and first_name will be None we could also make this a string, or we could even put a default name!
How we call our function later does change a little bit though, because we no longer rely on the position to determine what variable it is we must tell the function what value each argument populates. Cool fact, optional arguments don’t need to be in order!
def print_welcome_message(title=None, first_name=None):
    if title and first_name:
        print(f"Welcome {title} {first_name}!")
    elif title:
        print(f"Welcome {title}!")
    elif first_name:
        print(f"Welcome {first_name}!")
    else:
        print(f"Welcome unkown user!")

print_welcome_message(title="Mx")
print_welcome_message(first_name="Buffy")
print_welcome_message(title="Ms", first_name="Willow")
print_welcome_message(first_name="Buffy", title="Mx")
print_welcome_message()
Welcome Mx!
Welcome Buffy!
Welcome Ms Willow!
Welcome Mx Buffy!
Welcome unkown user!
Using Positional Arguments and Optional Arguments
We’ve now seen how we can use positional arguments and optional arguments, but can we use both at the same time? Yes! We can! However, when we do, we must always put the positional arguments first like so:
def print_welcome_message(first_name, last_name=None, title=None):
    if title and first_name and last_name:
        print(f"Welcome {title} {first_name} {last_name}!")
    elif title and first_name:
        print(f"Welcome {title} {first_name}!")
    elif first_name and last_name:
        print(f"Welcome {first_name} {last_name}!")
    elif title:
        print(f"Welcome {title}!")
    elif last_name:
        print(f"Welcome {last_name}!")
    else:
        print(f"Welcome {first_name}!")

print_welcome_message("Buffy")
print_welcome_message("Buffy", last_name="Summers")
print_welcome_message("Buffy", title="Mx")
print_welcome_message("Buffy", last_name="Summers", title="Mx")
Welcome Buffy!
Welcome Buffy Summers!
Welcome Mx Buffy!
Welcome Mx Buffy Summers!
Returning Data
The Python return statement is a special statement that you can use inside a function or method to send the function’s result back to where it was called from. A return statement consists of the return keyword followed by an optional return value, here we convert our previous example to return our message instead of printing it:
def create_welcome_message(first_name, last_name=None, title=None):
    if title and first_name and last_name:
        return f"Welcome {title} {first_name} {last_name}!"
    elif title and first_name:
        return f"Welcome {title} {first_name}!"
    elif first_name and last_name:
        return f"Welcome {first_name} {last_name}!"
    elif title:
        return f"Welcome {title}!"
    elif last_name:
        return f"Welcome {last_name}!"
    else:
        return f"Welcome {first_name}!"

print(create_welcome_message("Buffy"))
print(create_welcome_message("Buffy", last_name="Summers"))
print(create_welcome_message("Buffy", title="Mx"))
print(create_welcome_message("Buffy", last_name="Summers", title="Mx"))
Welcome Buffy!
Welcome Buffy Summers!
Welcome Mx Buffy!
Welcome Mx Buffy Summers!
Now we understand how to build functions and what each part means, we can continue to build out our build_argument_parser() function.
First, we add into our function argparse.ArgumentParser().
This command calls argparse an in-built Python that makes it easy to write user-friendly command-line interfaces and creates a new ArgumentParser for us to use to capture input from our users.
Remember to make sure you create a variable to assign the output of argparse.ArgumentParser() to.
Once we have created out parser we will want to later parse those arguments so we can see what information the user has provided. We can do this by calling the parse_args() function on our parser object:
import argparse

def build_argument_parser():
    # The following line says to Python we want the variable parser to equal the ArgumentParser class
    # which can be found in the argparse library.
    parser = argparse.ArgumentParser()

    # The following line calls a function parse_args() (parse arguments) on the data stored in the
    # parse object we previously created.
    parser.parse_args()
Before we run this code though we want to put another ✨ magical ✨ function at the very bottom of our file. This is the a __name__ guard, which we go into more detail about in the Nameguard Basics section. All you need to know for now is that it’s not always required but can be helpful.
import argparse

def build_argument_parser():
    parser = argparse.ArgumentParser()
    # add_arguments here
    parser.parse_args()

if __name__ == '__main__':
    build_argument_parser()
usage: ipykernel_launcher.py [-h]
ipykernel_launcher.py: error: unrecognized arguments: -f /tmp/tmpuri3horo.json --HistoryManager.hist_file=:memory:
An exception has occurred, use %tb to see the full traceback.

SystemExit: 2
/home/vsts/.cache/pypoetry/virtualenvs/errbufferoverfl-me-3AFF4dIC-py3.7/lib/python3.7/site-packages/IPython/core/interactiveshell.py:3449: UserWarning: To exit: use 'exit', 'quit', or Ctrl-D.
  warn("To exit: use 'exit', 'quit', or Ctrl-D.", stacklevel=1)
Run your application, if everything went the way we expected you probably got something like the following snippet in the console at the bottom of the application, if you are using Juypter Notebooks you likely got an error which should be expected (at the end of this chapter we show you how to manage this warning so you can test your code in Juypter Notebooks):
/Users/rebecca/.virtualenvs/bernauer/bin/python /Users/rebecca/tmp/bernauer/bernauer.py

Process finished with exit code 0
Now we have a skeleton function where we can build out parser. Filling an ArgumentParser with information about your application is done by using the add_argument() function, which we’ll cover in the next major section. For now, let’s chat about:
Unix Error Codes
On Portable Operating System Interface (POSIX) systems (like Linux and macOS) the standard exit code is 0 for success and any number from 1 to 255 for anything else.
While it’s not required, returning consistent error codes both within your own projects and as part of the wider software ecosystem is a good habit to form, it sets you up to better understand when certain errors are occurring, how to prevent them and it makes debugging user issues a lot more straightforward.
The good thing is Python has the errno standard library that can help you handle, most common POSIX errors. It also supports turning the error numbers into common strings, so if you do need to terminate your program unexpectedly, you can easily return some additional information. Below are some examples of how you might do this:
Handling a Missing File
import pathlib
import errno
import os

myfile = pathlib.Path("doesnotexist.txt")

try:
    with myfile.open() as file:
        file.readlines()
except FileNotFoundError:
    print(os.strerror(errno.ENOENT))
except IOError:
    print(os.strerror(errno.EIO))
No such file or directory
Handling an Unimplemented Function
import errno
import os
import random
import string

def decode(message, shift):
    return os.strerror(errno.ENOSYS)

def encode(message, shift):
    return ''.join(
        list(
            map(
                lambda message: chr((ord(message)+shift)),message
            )
        )
    )

my_cipher = encode(''.join(random.choices(string.ascii_uppercase + string.digits, k=6)), 4)
print(f"Your encoded message is: {my_cipher}")
message = decode(my_cipher, 4)
print(message)
Your encoded message is: ;XW6SG
Function not implemented
Handling a Host not on the Network
import platform
import subprocess
import os
import errno

def ping(host):
    param = '-n' if platform.system().lower()=='windows' else '-c'
    command = ['ping', param, '1', host]

    if subprocess.call(command) == 0:
        return "Machine is on the network"
    else:
        return os.strerror(errno.ENONET)


host_alive = ping("10.0.0.12")
print(host_alive)
Machine is not on the network
Ultimately there are various ways you can use, return and check these errors these are only some of the simpler ways, so I encourage you to go out and try working with them throughout this course!
Parsing User Input
If you have some familularity with command line applications you may have noticed, there are often cases where there is a minimum amount of information we must provide before we are able to do something, and there are optional flags we can provide. These are known as positional and optional requirements, and I’ll show you how using argparse you can make these.
If you aren’t familiar with this idea let’s, try it out now, if you’re running on Linux or macOS you should be able to call a program called ls which is a command to list computer files. In its simplest form you can run just ls and it will list all the files in your current directory.
ls
 00_introduction.ipynb                         07_credits.ipynb
 01_welcome_to_the_jungle.ipynb                08_solutions.ipynb
 02_build_your_command_center.ipynb           'Python Primer.pptx'
 03_handling_word_lists.ipynb                 'Snake Charming Day 01.pptx'
 04_exploiting_cve-2014_0160.ipynb            'Snake Charming Day 02.pptx'
 05_gathering_system_level_information.ipynb   _images/
 06_contacting_the_unix_daemons_of_old.ipynb   one_hundered_subdomains.txt
You can also tell ls to show you the contents of another directory, by providing the path to that directory as the first argument, this is known as a positional argument, and it means the application should know what to do with it from its location in the command:
ls _images/
DragonLady.png
exploiting_cve-2014-0160-big-endian.png
exploiting_cve-2014-0160-common_ports.png
exploiting_cve-2014-0160-little-endian.png
exploiting_cve-2014-0160-osi_model.png
exploiting_cve-2014-0160-ssltls_client_hello.png
exploiting_cve-2014-0160-ssltls_handshake.gif
exploiting_cve-2014-0160-wireshark.png
here_be_dragons.jpg
subdomain_enumeration_name_file.png
subdomain_enumeration_new_file.png
subdomain_enumeration_new_project.png
welcome_to_the_jungle.jpg
Finally, you can also provide additional information, or tell the program to do things differently, using what we call flags or optional arguments. As the name suggests these are optional and you don’t need to use them to make the program run. In Linux based systems (macOS & UNIX-based operating systems) these are often denoted with a dash (short versions) or double dash (long versions), but this can vary sometimes.
Depending on the program, you will sometimes have short and long versions available for the same commands, and sometimes you’ll only have one or the other. If you’re still a bit confused, let’s revisit ls with some examples:
Using ls with a short version optional argument
In the following example, I will use ls -S to sort all my files by size with the largest first:
ls _images/ -S
exploiting_cve-2014-0160-common_ports.png
exploiting_cve-2014-0160-ssltls_client_hello.png
exploiting_cve-2014-0160-wireshark.png
DragonLady.png
subdomain_enumeration_new_file.png
welcome_to_the_jungle.jpg
subdomain_enumeration_new_project.png
here_be_dragons.jpg
exploiting_cve-2014-0160-osi_model.png
subdomain_enumeration_name_file.png
exploiting_cve-2014-0160-ssltls_handshake.gif
exploiting_cve-2014-0160-big-endian.png
exploiting_cve-2014-0160-little-endian.png
Using ls with a long version optional argument
In the proceeding example I used the -S optional argument to sort my files by size, however this optional argument does not have a long version, so instead I will show all my files and directories, and ask to have the directories listed first:
ls --group-directories-first
 _images/
 00_introduction.ipynb
 01_welcome_to_the_jungle.ipynb
 02_build_your_command_center.ipynb
 03_handling_word_lists.ipynb
 04_exploiting_cve-2014_0160.ipynb
 05_gathering_system_level_information.ipynb
 06_contacting_the_unix_daemons_of_old.ipynb
 07_credits.ipynb
 08_solutions.ipynb
'Python Primer.pptx'
'Snake Charming Day 01.pptx'
'Snake Charming Day 02.pptx'
 one_hundered_subdomains.txt
Using ls with a long version optional argument
We now know how we can use long and short versions of optional arguments. In this example I will show you that sometimes you have the option of using a long or short argument to achieve the same outcome. In this case I will be printing all the contents of my directory without quoting (you will notice, compared to the output in the above example, this one has no ' quotes around file names that contain spaces:
ls -N
00_introduction.ipynb                        07_credits.ipynb
01_welcome_to_the_jungle.ipynb               08_solutions.ipynb
02_build_your_command_center.ipynb           Python Primer.pptx
03_handling_word_lists.ipynb                 Snake Charming Day 01.pptx
04_exploiting_cve-2014_0160.ipynb            Snake Charming Day 02.pptx
05_gathering_system_level_information.ipynb  _images/
06_contacting_the_unix_daemons_of_old.ipynb  one_hundered_subdomains.txt
We can also use the long version of the -N command --literal (you may have noticed that the long and short versions don’t have to match at all):
ls --literal
00_introduction.ipynb                        07_credits.ipynb
01_welcome_to_the_jungle.ipynb               08_solutions.ipynb
02_build_your_command_center.ipynb           Python Primer.pptx
03_handling_word_lists.ipynb                 Snake Charming Day 01.pptx
04_exploiting_cve-2014_0160.ipynb            Snake Charming Day 02.pptx
05_gathering_system_level_information.ipynb  _images/
06_contacting_the_unix_daemons_of_old.ipynb  one_hundered_subdomains.txt
Using ls with optional “mandatory” arguments
The last thing I want to touch on before we move on, is in some cases, optional arguments must be used in conjunction with another optional argument to work correctly. Which is why I call them optional mandatory arguments. For example, if I want to ask ls to show me the author of my files I can use the --author argument, right?
ls --author
 00_introduction.ipynb                         07_credits.ipynb
 01_welcome_to_the_jungle.ipynb                08_solutions.ipynb
 02_build_your_command_center.ipynb           'Python Primer.pptx'
 03_handling_word_lists.ipynb                 'Snake Charming Day 01.pptx'
 04_exploiting_cve-2014_0160.ipynb            'Snake Charming Day 02.pptx'
 05_gathering_system_level_information.ipynb   _images/
 06_contacting_the_unix_daemons_of_old.ipynb   one_hundered_subdomains.txt
From the output, we can see this isn’t the case and no author is shown, however if we look really careful at the documentation for ls we can see:
--author
    with -l, print the author of each file
That we should be using it with the -l optional command, which uses the long listing format, so I should try:
ls --author -l
total 4704
-rw-r--r-- 1 jupyter-rtrapani jupyter-rtrapani jupyter-rtrapani    6822 Jul 14 22:15  00_introduction.ipynb
-rw-r--r-- 1 jupyter-rtrapani jupyter-rtrapani jupyter-rtrapani    1377 Oct 14  2020  01_welcome_to_the_jungle.ipynb
-rw-r--r-- 1 jupyter-rtrapani jupyter-rtrapani jupyter-rtrapani   24702 Jul 14 23:01  02_build_your_command_center.ipynb
-rw-r--r-- 1 jupyter-rtrapani jupyter-rtrapani jupyter-rtrapani   28445 Jul 14 00:13  03_handling_word_lists.ipynb
-rw-r--r-- 1 jupyter-rtrapani jupyter-rtrapani jupyter-rtrapani  113949 Jul 14 12:21  04_exploiting_cve-2014_0160.ipynb
-rw-r--r-- 1 jupyter-rtrapani jupyter-rtrapani jupyter-rtrapani     555 Oct 16  2020  05_gathering_system_level_information.ipynb
-rw-r--r-- 1 jupyter-rtrapani jupyter-rtrapani jupyter-rtrapani     555 Oct 16  2020  06_contacting_the_unix_daemons_of_old.ipynb
-rw-r--r-- 1 jupyter-rtrapani jupyter-rtrapani jupyter-rtrapani     555 Oct 16  2020  07_credits.ipynb
-rw-r--r-- 1 jupyter-rtrapani jupyter-rtrapani jupyter-rtrapani     555 Oct 16  2020  08_solutions.ipynb
-rw-r--r-- 1 jupyter-rtrapani jupyter-rtrapani jupyter-rtrapani  529857 Oct 14  2020 'Python Primer.pptx'
-rw-r--r-- 1 jupyter-rtrapani jupyter-rtrapani jupyter-rtrapani 1148889 Oct 14  2020 'Snake Charming Day 01.pptx'
-rw-r--r-- 1 jupyter-rtrapani jupyter-rtrapani jupyter-rtrapani 2924089 Oct 14  2020 'Snake Charming Day 02.pptx'
drwxr-xr-x 2 jupyter-rtrapani jupyter-rtrapani jupyter-rtrapani    4096 Oct 16  2020  _images/
-rw-r--r-- 1 jupyter-rtrapani jupyter-rtrapani jupyter-rtrapani     556 Oct 16  2020  one_hundered_subdomains.txt
And now we can see the author! If you’re still unclear about this concept that’s okay! As you test and tinker more and more, you’ll become more familiar with the idea – don’t feel pressured to understand everything the first time you encounter it.
Creating Positional and Optional Arguments
argparse supports the creation of both types of arguments we have spoken about. The library also supports the creation of what I previously called optional "mandatory" arguments but this part is a bit more advanced and won’t be covered today, but there will be resources at the bottom of the page that you can check out if you’d like to try it out.
Now, as I was saying, argparse supports the creation of both types of arguments, below I will show you how to create one of each:
Creating a Positional Argument
To create a positional argument, we initialise out parser like we did earlier, and then using the add_argument function, provide an argument name, a type if you want and some helpful information, like so:
import argparse

parser = argparse.ArgumentParser()
parser.add_argument("domain", type=str, help="a hostname, domain or IP address")
_StoreAction(option_strings=[], dest='domain', nargs=None, const=None, default=None, type=<class 'str'>, choices=None, help='a hostname, domain or IP address', metavar=None)
Creating an Optional Argument
To create an optional argument, it’s very similar, except this time we should provide the first parameter, in our last example this was domain as a short or long option (you can also provide both at once):
Creating a Short Version Optional Argument
import argparse

parser = argparse.ArgumentParser()
parser.add_argument("domain", type=str, help="a hostname, domain or IP address")
parser.add_argument("-w", type=str, help="a path to a wordlist")
_StoreAction(option_strings=['-w'], dest='w', nargs=None, const=None, default=None, type=<class 'str'>, choices=None, help='a path to a wordlist', metavar=None)
Creating a Long Version Optional Argument
import argparse

parser = argparse.ArgumentParser()
parser.add_argument("domain", type=str, help="a hostname, domain or IP address")
parser.add_argument("--wordlist", type=str, help="a path to a wordlist")
_StoreAction(option_strings=['--wordlist'], dest='wordlist', nargs=None, const=None, default=None, type=<class 'str'>, choices=None, help='a path to a wordlist', metavar=None)
Creating an Optional Argument with Both
import argparse

parser = argparse.ArgumentParser()
parser.add_argument("domain", type=str, help="a hostname, domain or IP address")
parser.add_argument("-w", "--wordlist", type=str, help="a path to a wordlist")
_StoreAction(option_strings=['-w', '--wordlist'], dest='wordlist', nargs=None, const=None, default=None, type=<class 'str'>, choices=None, help='a path to a wordlist', metavar=None)
Now that we know how to create positional, and optional parameters to our application, we can take this code and put it into our build_argument_parser() function:
import argparse

def build_argument_parser():
    parser = argparse.ArgumentParser()
    parser.add_argument("domain", type=str, help="a hostname, domain or IP address")
    parser.add_argument("-w", "--wordlist", type=str, help="a path to a wordlist")
    parser.parse_args()

if __name__ == '__main__':
    build_argument_parser()
usage: ipykernel_launcher.py [-h] [-w WORDLIST] domain
ipykernel_launcher.py: error: unrecognized arguments: -f
An exception has occurred, use %tb to see the full traceback.

SystemExit: 2
As we mentioned earlier, ArgumentParser has the ability to parse the user input via the parse_args() function. This determines what options have and have not been selected and makes sure the data provided by the user matches the type specified (if you did this).
If everything is okay, and the user has not provided us with data that does not fit the constraints we outline when making the parser, a Namespace object will be built and returned to you (the programmer).
However, before we move on, we want to modify the last line in our function so instead of just calling parser.parse_args() we also return the results.
import argparse

def build_argument_parser():
    parser = argparse.ArgumentParser()
    parser.add_argument("domain", type=str, help="a hostname, domain or IP address")
    parser.add_argument("-w", "--wordlist", type=str, help="a path to a wordlist")
    return parser.parse_args()

if __name__ == '__main__':
    build_argument_parser()
usage: ipykernel_launcher.py [-h] [-w WORDLIST] domain
ipykernel_launcher.py: error: unrecognized arguments: -f
An exception has occurred, use %tb to see the full traceback.

SystemExit: 2
🔵 Note
argeparse.Namespace is a simple class that is used by default by the parse_args() function to create an object that can hold attributes and return it.
Returning & Storing Data
The very last thing we need to do is create a variable for the returned information to be stored in. We should do this in the __main__ guard:
import argparse

class Args:
    domain = "google.com"

def build_argument_parser():
    parser = argparse.ArgumentParser()
    parser.add_argument("domain", type=str, help="a hostname, domain or IP address")
    parser.add_argument("-w", "--wordlist", type=str, help="a path to a wordlist")
    return parser.parse_args()

if __name__ == '__main__':
    # In your normal code this would be:
    # args = build_argument_parser()
    # This just supresses the warning in Juypter Notebooks
    args = Args()
Optional Activity
If you’re the decorating and/or customisation type you can also add a description to your argument parser, so it comes out something like the example below:
usage: bernauer.py [-h] -d DOMAIN [-w PATH_TO_WORDLIST]

_
| |_ ___ ___ ___ ___ _ _ ___ ___
| . | -_|  _|   | .'| | | -_|  _|
|___|___|_| |_|_|__,|___|___|_|

Version: 0.0.0

optional arguments:
-h, --help            show this help message and exit
-d DOMAIN, --domain DOMAIN
                     the domain which you wish to bruteforce subdomains e.g. google.com
-w PATH_TO_WORDLIST, --wordlist PATH_TO_WORDLIST
                     the word list you wish to use to find subdomains, if no word list is specified the in-build one will be used.
To get started doing this you will want to add the named argument description="your text here" to your call to argparse.ArgumentParser().
🟢 Hint
argparse.RawTextHelpFormatter is a special formatter_class used with ArgumentParser to give you more control over how text descriptions are displayed. Normally ArgumentParser objects will line-wrap the description.
Notes
Nameguard Basics
When the Python interpreter reads a source file it configures several special variables, most of which we don’t need to worry about. However, in this case we care about the __name__ variable.
When your “module” is the main program, that is you are running your code like:
% python3 program.py
% ./program.py
The interpreter will add the hard-coded string "__main__" to the __name__ variable.
When your “module” is imported by another “module” or application the interpreter will look at the filename of your module, program.py, strip off the .py, and assign that string to your module’s __name__ variable.
When your code is eventually getting executed it will see that __name__ is set to "__main__" it will call any function within that if-statement, in our case build_argument_parser().